Polaris
Thank you for choosing INCYT and purchasing the Polaris! Let’s get you started with a few simple steps:
1. Set Up Your INCYT Account
Before you activate your device, you'll need to create an INCYT account:
- Download the INCYT app from Google Play or the Apple App Store, or visit dashboard.incyt.io.
- Create an account and organisation or log in if you already have one.
- Check out this video tutorial on setting up an INCYT account and organisation.
2. Register and Link Your Device
Now that you’re logged in to your organisation:
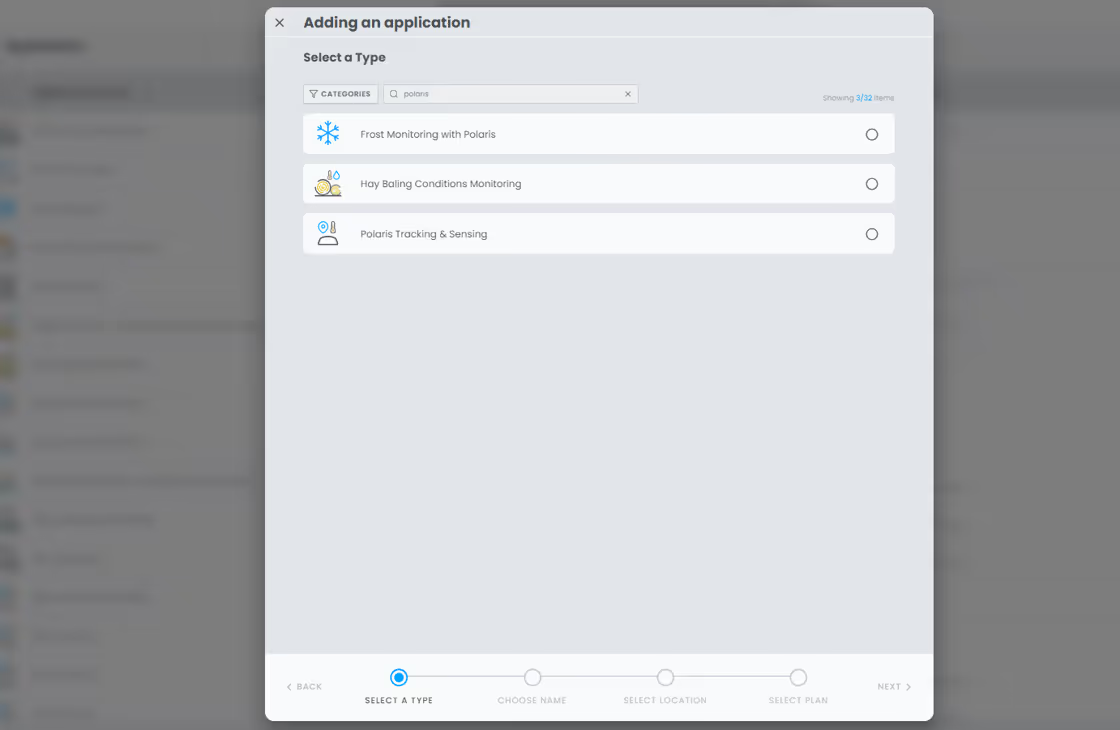
- Add the appropriate application in the app
- Do this by clicking "Add a new application" on the Application page.

- In the list of applications select the correct Polaris application depending on your use (Frost Monitoring with Polaris, Hay Baling Conditions Monitoring, or generic Polaris Tracking and Sensing for animal traps or pump runtime monitoring).
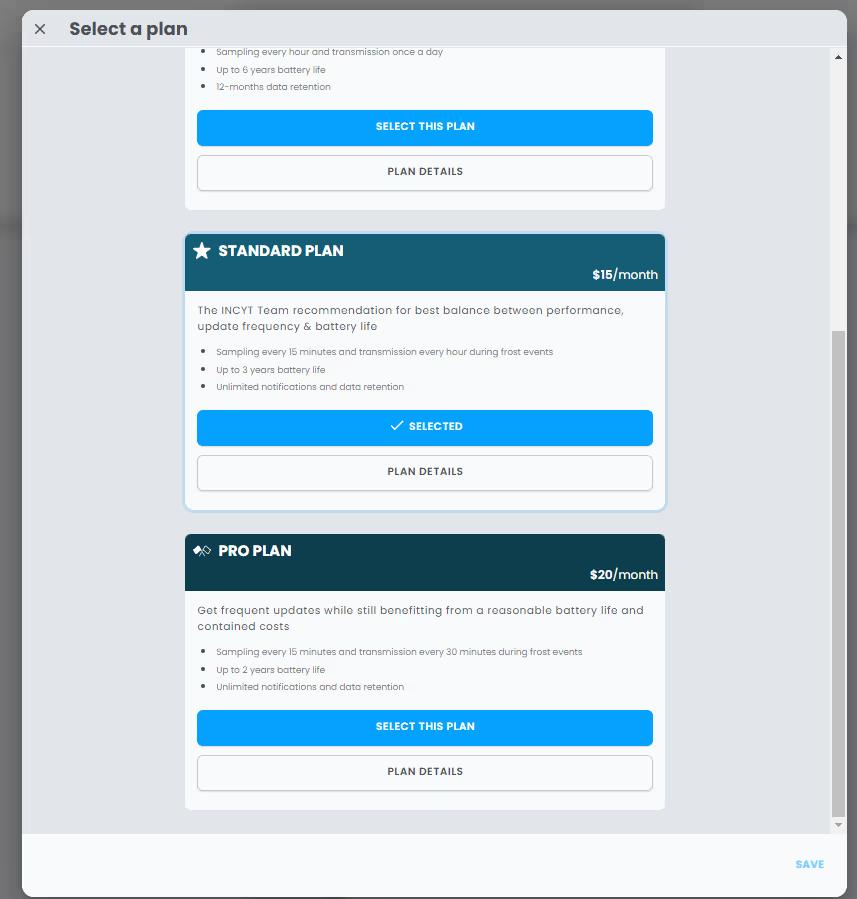
- Select the application plan appropriate for your use. Don't worry - you can change plans from within the app later if you decide to increase or decrease reporting frequency. You can adjust this as often as you like and will be billed accordingly.
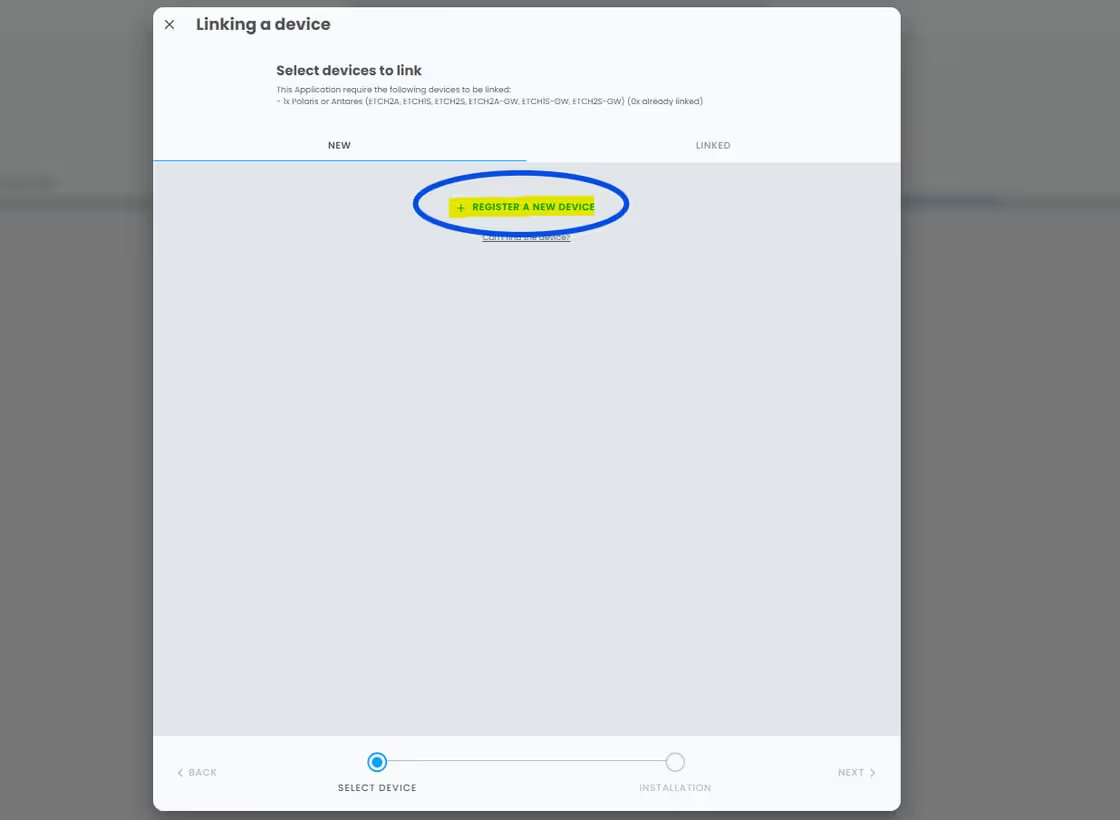
- Next you will register the device to the application. Go to the application page and select Devices.
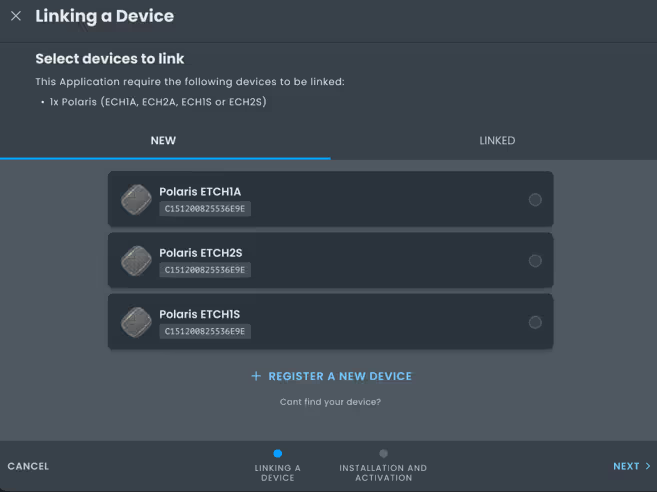
- Then click Link A Device

- In this window select Register a New Device
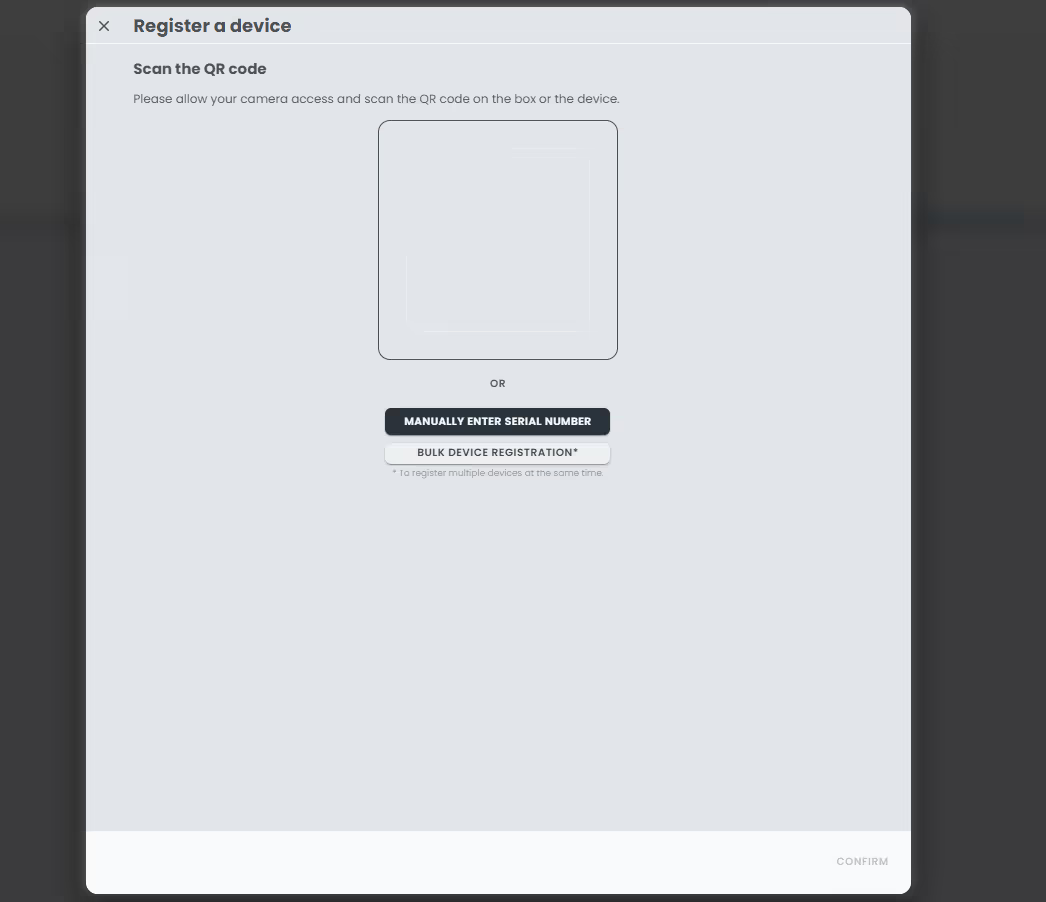
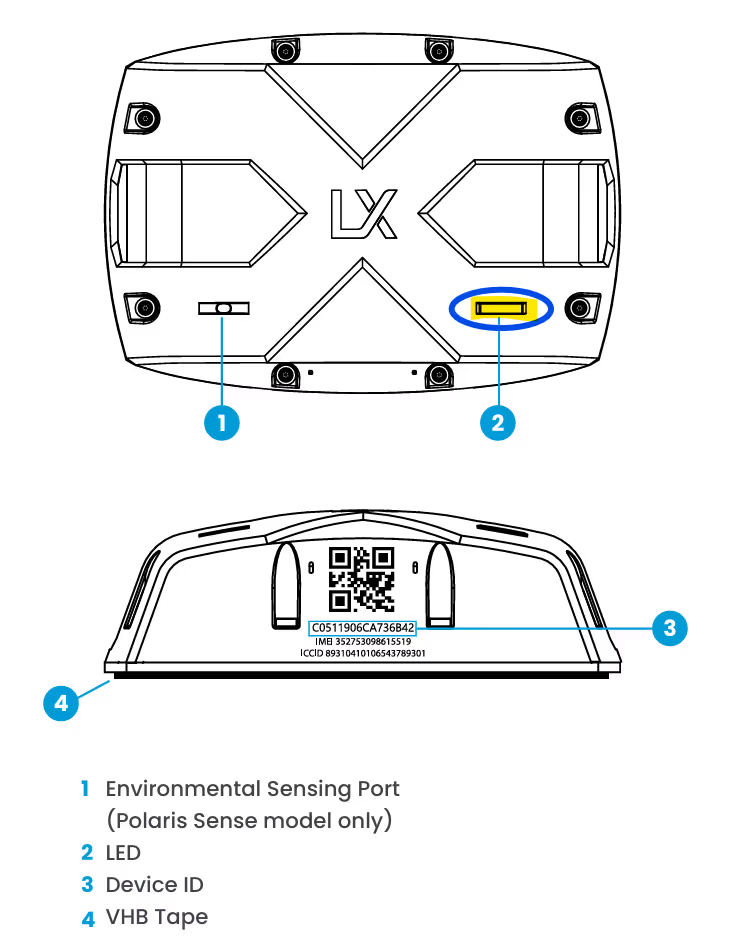
- Now use your camera to snap a picture of the QR code on the device or the box label (they're the same!)
- If you don't have a camera you can manually enter the serial number of the device, found on the device and on the box label.
- Now in the Linking a Device page select the Polaris you just entered and click Next
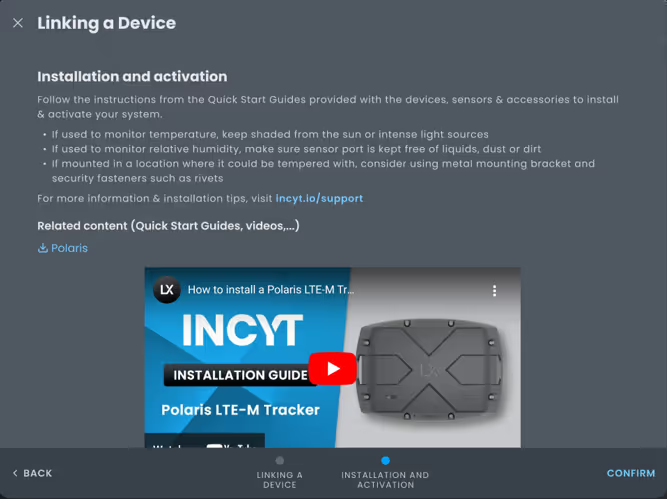
- The app will now prompt you to complete device activation. There will also be some installation resources displayed for Polaris, like the Quick Start Guide that is included in the box.
3. Device Activation - Connectivity is Key!
- Before activating the Polaris, make sure you're in an area with strong cellular reception - that means a spot where you can make a phone call, not just send a text.
Note: Activating your device in an area with strong cellular connection ensures that the initial configuration data is sent through successfully, similar to how a phone call requires a good signal. Once activated and connected to the app, the device will only send small amounts of data, much like sending a text message. After successful activation you can install the device in its final location, even in areas with weaker reception, and it will still function effectively.
To activate the device:
- Place the device outdoors with a clear view of the sky.
- Swipe the included magnet over the LED on the device.
- If the LED starts blinking white, swipe again within 5 seconds.
- The LED will stay on for 5 seconds, indicating activation is in progress.
Note - If the LED turns a different colour for 3 seconds, the device is already activated. - The device will then attempt to connect to the
INCYT platform for activation and configuration. This
process, indicated by the LED blinking, may take
several minutes. - Once the device is activated and connected, the LED will stay white for 10 seconds before turning off.
4. Check for Activation in the App
- After completing the activation steps it is time to check that the device is successfully connected in the INCYT app.
- Open the Application page and click Devices. You should see the Polaris, along with an indicator of its Signal Strength, Battery, and when it was last seen.
- If the application shows "Inactive" or the device shows "Last Seen - Never", the Polaris has not yet been found in the App. Give it a few more minutes to connect, or try activating it again in an area with stronger cellular connectivity. Swipe the magnet over the LED at least four times in the area with better connectivity. This will prompt the device to attempt activation again.

Installation Tips for Optimal Performance
- When selecting a place to install your Polaris system:
- Connectivity: Ensure an unobstructed view of the sky for GPS and communication accuracy.
- Weather Shield - Install the Polaris in its weather shield if purchased
Get to know your Polaris tracker
Shipping Mode
The Polaris / Antares / Andromeda device fresh out of the box is in state 'Shipping'. In the 'Shipping' state the device consumes low power, and is in a state of constant sleep.
How to check if the device is in shipping mode and to get out of shipping mode.
Swipe the Magnet once - the whitish pink LED will Blink for 5 seconds.
Swiping the device a second time will get the device to go out from Shipping to Activation mode.
Activation Mode
In this mode, the device will try to establish a connection to the cellular network, the INCYT Platform via authenticated connection, and then configure the device to finally activate the device.
We can call it the two Traffic light sequence that the device needs to go through .
Red, Orange, Green, Red, Orange, Green.
For each of the sequence, the LED would blink for a 0.5 second duty cycle and blink until its current stage is complete.
- 0.5 second Blinking RED – the device is attempting to connect to the network . Once cellular connection is established it will move onto the next stage.
- 0.5 second Blinking ORANGE – the device has successfully connected to the network and is attempting to connect to the INCYT platform via its FACTORY AUTHENTICATION (BOOTSTRAP CERTIFICATE/FACTORY KEY) (COMMISSIONING PHASE)
- 0.5 second Blinking GREEN – the device has successfully established an authenticated connection to the platform using its FACTORY KEY and is now downloading is EVERYDAY USE KEY (PRODUCTION CERTIFICATE), for establishing the connection in the future/from now on.
- 0.5 second Blinking RED – you may even not see this stage because cellular connection is still established and live.
- 0.5 second Blinking ORANGE – using the EVERYDAY USE KEY to establish a connection to the network, if the device fails at this stage, that means that the certificate that is download has an error. But if everything goes well it will proceed to the next stage.
- 0.5 second Blinking GREEN – the device is now established an authenticated network connection to the INCYT platform via the EVERYDAY USE KEY, and now is trying to download the config for the device. If everything goes well, the device will have configured the device successfully and then would resolve its GPS CO-ORDs and then data packet, and would proceed to the next state.
- SOLID WHITE for 3/5 seconds – the device is now activated.
Failure in any phase of activation
If the device fails in any of the activation phases, the device would, go retry mode.
A short heartbeat like double blink of the RED LED. A short double red blink every 5 seconds for about 60 seconds until it retries again.
Activated Device - Active Mode
Once the device is active if you swipe once, the device will Blink the a SOLID RED / ORANGE / GREEN according to the state of the device's last self test.
1. GREEN – All Okay
2. ORANGE – Temporary Issue
3. RED – Permanent Issue (We can still get out of it.) (Details on the LED state is out of the scope of this document).
But by swiping once you can know if the device is ACTIVE MODE. To confirm twice if the device is in active mode, swipe a second time (if the device is no busy and is in the IDLE state), the LED should go BLUE.
Self Test Mode
Once your device is in active mode, if you Swipe once the device will blink a SOLID
RED /ORANGE / GREEN according to the results from the previous self test the device had done.
If you swipe a second time. If the Device still blinks the same LED colour, that means the device is busy and you should wait for the device to go back into its IDLE state which should take about a minute or two.
If the device becomes back to IDLE state.
SWIPE 1 – RED/ORANGE/GREEN
SWIPE 2 – SINGLE SHORT 0.5 second BLUE Blink
SWIPE 3 – DOUBLE SHORT 0.2 second BLUE Blink
SWIPE 4 – QUAD Short BLUE Blink, and then the device will go into Self Test Mode.
Then device will go into Blink 0.5 seconds PINKISH WHITE, for 10 seconds and go into self test mode for about 3-4 minutes.
The device will then complete a self test, and try to resolve the GPS coordinates at the end of the self test. This is one way you can force the device to push a data packet.
During the self test mode the Device will be busy and you wont be able to do anything with that device.
